
The Cuisinart arrived in American kitchens in 1973, and the price made people stop and reconsider at the store. Praise from food writers including Craig Claiborne, James Beard, and Julia Child built the buzz, and by the 1976 holiday season demand outran supply so badly that some stores sold empty boxes as promises of a machine to come. The people who finally got one had saved for months, received it as a combined wedding gift, or watched it come down from a high shelf at Christmas. Nobody put that much money’s worth of kitchen equipment on the counter and used it for chopped celery.
The recipes that poured out of cooking magazines in the late 1970s and early 1980s were designed to prove the purchase worthwhile: smooth country pâté, cold soups that once required pushing through a sieve, mayonnaise in two minutes, spreads that previously needed a mortar and pestle or a professional grinder. A stripe of French and Mediterranean cooking that had always belonged to caterers or very patient home cooks suddenly fit a weeknight kitchen. Here are seven dishes that went from machine unboxed to dinner table in those first months.
1. Country Pâté (Pâté de Campagne)
Country pâté occupied a specific rung on the restaurant ladder in the late 1970s: not quite special-occasion food, but not casual either. It appeared on the appetizer menus of the French bistros that opened in American cities through the seventies, usually as a few slices with cornichons and mustard. The food magazines understood the Cuisinart’s appeal for this dish. Grinding fatty pork to a coarse, uneven texture by hand required a heavy metal meat grinder clamped to the counter. The steel blade on a food processor did it in seconds, and quick on-off bursts gave you real control over the grind.
The calculation that made home cooks reach for this recipe first was price. Country pâté runs on pork shoulder, pork liver, and pork fatback: in descending order of supermarket appeal, three of the cheapest things in the pork case. Liver and fatback have never been cuts people line up for, which is exactly why a full two-pound terrine, enough to serve eight people as a first course, cost far less to make at home than a restaurant charged for a few slices. In France, pâté de campagne is everyday charcuterie, the kind bought by the slice and eaten on bread for lunch rather than set out for guests.
Ingredients (Makes one 9×5-inch terrine, serves 8 to 10 as a first course)
-
1 pound pork shoulder, cut into 1-inch cubes, chilled
-
1/2 pound pork liver, trimmed of membranes and cut into 1-inch pieces, chilled
-
1/2 pound pork fatback, cut into 1-inch cubes, chilled
-
1 medium yellow onion, roughly chopped
-
3 tablespoons brandy or dry vermouth
-
2 1/2 teaspoons kosher salt
-
1/2 teaspoon black pepper
-
1/4 teaspoon ground allspice
-
1/4 teaspoon ground nutmeg
Instructions
1. Preheat the oven to 325°F. Set a kettle of water on to boil.
2. Lay 9 or 10 of the bacon strips in a 9×5-inch loaf pan, running them across the short way with the ends hanging over the long sides, overlapping slightly until the bottom is fully covered.
3. Place the chilled pork shoulder in the food processor fitted with the steel blade. Pulse in 6 to 8 short bursts until coarsely ground; you want rough, uneven pieces, not a smooth paste. Transfer to a large bowl.
4. Add the chilled pork liver to the processor. Pulse 5 to 6 times, just until broken into rough chunks. Add to the bowl.
5. Add the fatback, onion, and garlic to the processor. Pulse 10 to 12 times until the fat is in small, irregular pieces and the onion is minced. Scrape into the bowl.
6. Whisk together the eggs, brandy, salt, thyme, pepper, allspice, and nutmeg in a small bowl, then pour the mixture over the meat. Use your hands to mix until everything is evenly combined, about 1 minute. Fry a teaspoon of the mixture in a small skillet until cooked through, taste it, and adjust the seasoning before packing the pan.
7. Pack the mixture firmly into the bacon-lined loaf pan, pressing out air pockets as you go. Fold the overhanging bacon over the top and lay the remaining strips across any bare spots. Set the bay leaves on top.
8. Cover the pan tightly with aluminum foil. Place it inside a larger roasting pan and pour the boiling water into the outer pan until it comes 1 inch up the sides of the loaf pan.
9. Bake at 325°F until an instant-read thermometer inserted in the center reads 160°F, about 1 hour 15 minutes to 1 hour 30 minutes.
10. Lift the loaf pan out of the water bath and set it on a wire rack. Remove the foil. While the pâté is still hot, set another loaf pan on top and weigh it down with two or three heavy cans. Let cool to room temperature, then transfer to the refrigerator, still weighted, and chill for at least 24 hours before slicing.
11. To unmold, run a knife along all four edges and invert onto a cutting board. Remove the bay leaves, slice about 1/2 inch thick, and serve.
2. Fresh Basil Pesto
Pesto went from an Italian-restaurant special to a home-kitchen habit in the late 1970s and 1980s, once the processor made the mortar optional. It has a bite to it that surprises people who’ve only ever had the jar version. The raw garlic hits first, sharp and direct, followed by the clean, slightly bitter flavor of fresh basil. Then the salt catches up. Parmesan carries a lot of it, and if you use a generous hand with the cheese, the whole thing pulls at your tongue in a way that makes you reach for bread, immediately.
The texture shifts depending on how long you run the machine. Stop early and you get something coarser, with visible green flecks and pine nut pieces that still have some chew. Run it another fifteen seconds and it turns almost smooth, closer to a paste that spreads cleanly on bread. Neither is wrong; they eat differently. Cold pesto straight from the refrigerator is muted. At room temperature, or barely loosened by a splash of hot pasta water, the olive oil opens up and the whole thing comes alive.
Toasting the pine nuts first, three or four minutes in a dry skillet until they turn the color of light caramel and smell faintly of butter, takes almost no time and rounds out the flavor considerably. Three cloves of garlic make the garlic register as a flavor of its own rather than a background note, and the olive oil goes in through the feed tube with the machine running, stopping the moment the pesto looks cohesive but still has some body, because pesto with some texture left in it eats better than a smooth paste.
Ingredients (Makes about 1 cup, serves 4 (enough to sauce 1 pound of pasta))
-
2 cups packed fresh basil leaves (about 2 ounces)
-
1/2 cup freshly grated Parmesan cheese
-
1/2 cup extra-virgin olive oil
-
1 tablespoon fresh lemon juice
Instructions
1. Toast the pine nuts in a dry skillet over medium heat, stirring often, until golden and fragrant, 3 to 4 minutes. Pour onto a plate and let cool for 5 minutes.
2. Combine the basil, pine nuts, garlic, and Parmesan in the bowl of a food processor. Pulse 8 to 10 times until roughly chopped.
3. With the machine running, pour the olive oil through the feed tube in a slow, steady stream. Process until the pesto comes together but still has some texture, about 15 to 20 seconds more.
4. Add the lemon juice and salt. Pulse 2 to 3 times to combine. Taste and adjust salt if needed.
5. Use immediately, or transfer to a jar, press a piece of plastic wrap directly against the surface to prevent browning, and refrigerate for up to 3 days.
3. Hummus
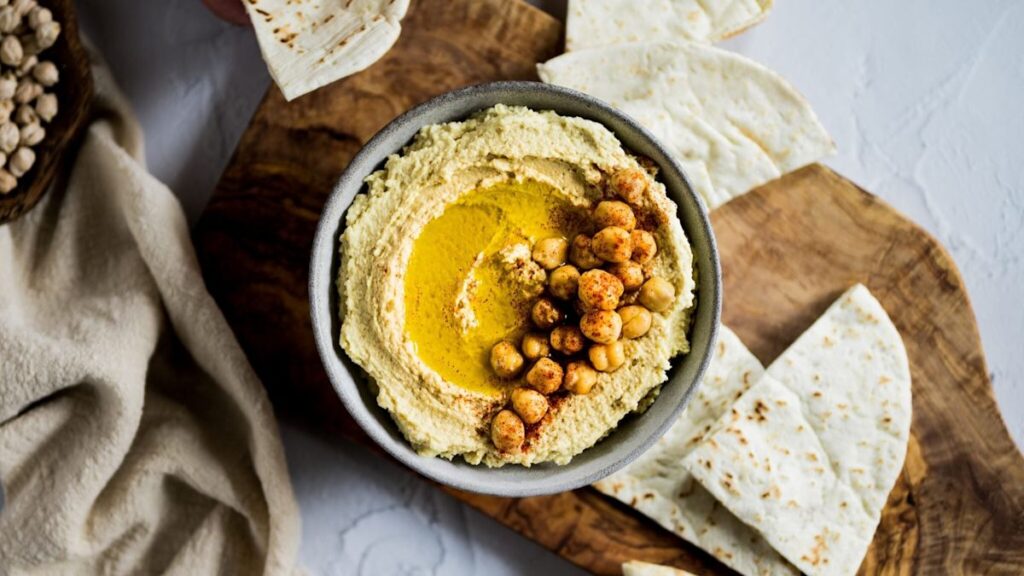
Before the Cuisinart, smooth hummus at home meant a food mill, a mortar, or a blender that stalled on thick chickpea paste. Canned chickpeas, already softened, still fought you through a ricer in lumpy protest. The food processor turned a twenty-minute struggle into ninety seconds of noise. That alone sold a lot of people on the machine.
The person who made hummus in those early Cuisinart years was usually the one running the dinner party. It showed up on Friday afternoons, whirred together before guests arrived at seven. A bowl with a drizzle of olive oil and a ring of paprika on top, a plate of pita triangles alongside, said you had been somewhere. You made it the night before and pulled it from the refrigerator 30 minutes early, so it came to the table at room temperature.
Tahini was the part that slowed people down, since many supermarkets of the era did not carry it, and cooks often tracked it down at natural foods stores or Middle Eastern groceries. In Dearborn, Michigan, home to one of the largest Arab-American communities in the United States, hummus had been a weekly table staple for decades before any food processor showed up in a suburban kitchen.
Ingredients (Makes about 2 cups, serves 6 to 8 as an appetizer)
-
1 1/2 cups drained cooked chickpeas (canned is fine), 3 tablespoons of their liquid reserved
-
3 tablespoons fresh lemon juice (from about 1 1/2 lemons)
-
1/2 teaspoon ground cumin
-
2 tablespoons olive oil, for serving
-
1/4 teaspoon paprika, for garnish
-
1 tablespoon finely chopped fresh parsley, for garnish
Instructions
1. Combine the chickpeas, tahini, lemon juice, garlic, cumin, and salt in the bowl of a food processor.
2. Process for 1 minute, stopping once to scrape down the sides.
3. With the machine running, drizzle in the reserved chickpea liquid one tablespoon at a time. Continue processing until the hummus is very smooth, about 1 to 2 minutes more. If it still seems thick, add water a tablespoon at a time until it loosens to a creamy consistency.
4. Taste and adjust salt and lemon juice as needed.
5. Transfer to a shallow bowl. Drizzle the 2 tablespoons of olive oil over the top, dust with paprika, and scatter the parsley over everything.
6. Serve at room temperature. Leftovers keep covered in the refrigerator for up to 4 days; let the hummus sit out for 30 minutes before serving again.
4. Gazpacho
Gazpacho was already in American cookbooks by the 1960s, often made in a blender. Fine-dicing a cucumber, a pepper, and an onion by hand for the chunky version took a good half hour of knife work, and the food processor cut that to a few minutes. Anyone who had spent real money on the machine had found their first actual use for it. New owners pulled the recipe out almost immediately, partly because it required no heat and no timing, and partly because something that sophisticated-sounding could be on the table before dinner guests finished their first drink.
The leftover situation turned out to be one of the best things about it. A full batch made more than most families could finish at one sitting, and the soup only got better overnight as the garlic and vinegar worked into the tomatoes. By the second day, people poured it into tumblers straight from the refrigerator, drinking it cold. Some stirred in a shot of vodka. Some spooned it over scrambled eggs. The batch that started as a dinner-party first course often lasted four days and found four different uses.
Ingredients (Serves 6)
-
2 pounds ripe tomatoes, cored and cut into chunks
-
1 medium cucumber, peeled, seeded, and cut into chunks
-
1 red bell pepper, seeded and cut into chunks
-
1/2 medium red onion, cut into chunks
-
2 slices day-old white bread, crusts removed
-
3 tablespoons sherry vinegar
-
1/4 cup extra-virgin olive oil, plus more for serving
-
1 teaspoon kosher salt, plus more to taste
-
1/4 teaspoon black pepper
Instructions
1. Tear the bread into rough pieces, place in a small bowl, and add 2 tablespoons of water. Let it soak for 5 minutes.
2. Add the tomatoes, cucumber, bell pepper, red onion, and garlic to the food processor. Pulse 8 to 10 times to break down the chunks, then run continuously for 30 seconds until the mixture is a coarse puree.
3. Squeeze the soaked bread dry and add it to the processor along with the sherry vinegar, olive oil, 1 teaspoon salt, and black pepper. Process for another 30 seconds until fairly smooth.
4. Taste and adjust salt and vinegar. For a silkier result, pour the soup through a fine-mesh strainer set over a large bowl and press the solids through with the back of a spoon. For a chunkier texture, skip that step.
5. Transfer to a covered container and refrigerate for at least 2 hours. The flavors sharpen and the soup thickens as it sits, so overnight is better if you have the time.
6. Ladle into bowls and drizzle with olive oil before serving.
5. Homemade Mayonnaise
Mayonnaise was one of the first things new food processor owners tried, and the cooking magazines of the late 1970s ran the technique again and again. The trick the machine unlocked wasn’t the mixing; it was the drip. Keeping the emulsion from breaking requires adding oil almost drop by drop at the start, and doing it by hand means balancing a cup with one arm while whisking furiously with the other. With a food processor, the oil goes in through the feed tube while the blade keeps the eggs moving, so one hand does the pouring and the machine does the whisking. Running the egg, yolk, mustard, lemon juice, and vinegar for thirty seconds before any oil goes in gives the base a head start, and the mustard helps hold the emulsion together without making the mayonnaise taste of mustard.
Ingredients (Makes about 1 1/4 cups)
-
1 large egg plus 1 large egg yolk, at room temperature
-
1 1/2 teaspoons Dijon mustard
-
1 tablespoon fresh lemon juice
-
1 teaspoon white wine vinegar
-
1/4 teaspoon white pepper
-
1 cup sunflower oil or other neutral oil (not extra-virgin olive oil)
Instructions
1. Add the egg, yolk, mustard, lemon juice, vinegar, salt, and white pepper to the food processor fitted with the metal blade. Process for 30 seconds until the mixture is pale yellow and slightly thickened.
2. With the machine running, add the oil through the feed tube in the thinnest stream you can manage. Use the drip hole in the feed-tube pusher if your machine has one. The first 1/4 cup of oil is where emulsions break, so go slowly. After that you can increase to a thin but steady pour.
3. Once all the oil is incorporated, the mayonnaise should be thick and pale. Taste and adjust salt and lemon juice.
4. Transfer to a jar or covered container, refrigerate immediately, and use within 4 days.
5. This mayonnaise uses raw egg. Use pasteurized eggs if you are serving anyone pregnant, elderly, very young, or with a weakened immune system.
6. Salmon Mousse
Molded salmon mousse had been a party dish since the 1950s, set with gelatin in a fish-shaped mold and turned out onto a platter ringed with cucumber. What the food processor changed was the texture. Canned salmon, cream cheese, and sour cream went from flaky and streaked to completely smooth in about a minute, with no sieve and no electric mixer, which made the old centerpiece easy enough for an ordinary Saturday night.
It showed up on buffet tables through the late 1970s, surrounded by crackers and cucumber rounds, and the gelatin is what lets it hold its shape on the platter for the length of a party. The dill and horseradish keep the cream cheese from tasting heavy, and the grated onion disappears into the mousse completely once the blade has done its work.
Ingredients (Serves 10 to 12 as an appetizer)
-
1 teaspoon neutral oil, for the mold
-
1 envelope (2 1/4 teaspoons) unflavored powdered gelatin
-
1 pound canned salmon, drained, skin and bones removed
-
8 ounces cream cheese, softened and cut into 1-inch pieces
-
3 tablespoons fresh lemon juice
-
1 tablespoon finely grated yellow onion
-
2 tablespoons chopped fresh dill
-
1 teaspoon prepared horseradish
Instructions
1. Brush a 5-cup fish-shaped mold or a 5-cup bowl lightly with the oil. Set it in the refrigerator.
2. Sprinkle the gelatin over the cold water in a small heatproof bowl and let it sit for 5 minutes to soften.
3. Set the bowl over a small saucepan of barely simmering water and stir until the gelatin dissolves completely, about 2 minutes. Remove from the heat and let cool for 5 minutes. It should still be pourable.
4. Put the salmon, cream cheese, sour cream, lemon juice, onion, dill, horseradish, salt, and hot sauce in the food processor fitted with the metal blade. Process until completely smooth, stopping to scrape down the sides at least once, about 1 minute.
5. With the machine running, pour the warm gelatin through the feed tube in a steady stream. Process for 15 seconds until evenly combined.
6. Taste and adjust salt, lemon juice, or hot sauce as needed.
7. Scrape the mousse into the prepared mold, smooth the top with a spatula, and press plastic wrap directly onto the surface. Refrigerate until fully set, at least 4 hours or overnight.
8. To unmold, run a thin knife around the edge of the mold. Set a serving platter over the top and invert quickly, then lift away the mold. If the mousse clings, press a warm, damp kitchen towel against the outside of the mold for 10 seconds and try again. Serve surrounded by crackers or thinly sliced cucumber.
7. Chilled Cucumber Dill Soup
Cucumber soup was a summer magazine staple once food processors were in home kitchens, because it took about ninety seconds by machine. It turned up on backyard dinner-party tables in the late 1970s, usually served in individual cups set in bowls of ice, the dill fanned on top like a small flag. The thing worth knowing is that cucumbers keep weeping long after you stop chopping them; skip the draining step and the soup slides from creamy to thin over the course of an afternoon. Cold also compresses flavor, so taste it again right before it goes to the table.
Ingredients (Serves 4)
-
2 large English cucumbers (about 2 pounds total), peeled, halved lengthwise, seeded, and roughly chopped
-
1 teaspoon kosher salt, plus more to taste
-
2 cups plain whole-milk yogurt
-
1 cup cold chicken broth or vegetable broth
-
3 scallions, white and light green parts, roughly chopped
-
2 cloves garlic, smashed and peeled
-
1/4 cup fresh dill fronds, loosely packed, plus a few sprigs for garnish
-
2 tablespoons fresh lemon juice, plus more to taste
-
1/4 teaspoon white pepper
Instructions
1. Toss the cucumber pieces with 1 teaspoon kosher salt in a colander set over a bowl. Let them sit for 30 minutes, then press firmly with your hands to squeeze out as much liquid as possible. Discard the liquid.
2. Put the drained cucumber, garlic, scallions, dill fronds, lemon juice, and white pepper into the food processor. Process until very smooth, about 45 seconds, scraping down the sides once midway through.
3. Add the yogurt and pulse until fully combined, about 10 seconds.
4. Pour in the broth and pulse three or four times to incorporate. The soup should pour easily off a spoon; add a splash more broth if it seems too thick.
5. Taste and adjust for salt. Transfer to a lidded container and refrigerate for at least 2 hours, until completely cold.
6. Taste again just before serving and add more salt or lemon juice as needed. Ladle into chilled bowls and top each with a few dill sprigs.
The Cuisinart is still on a lot of kitchen counters, fifty years on. These recipes are why it got there.